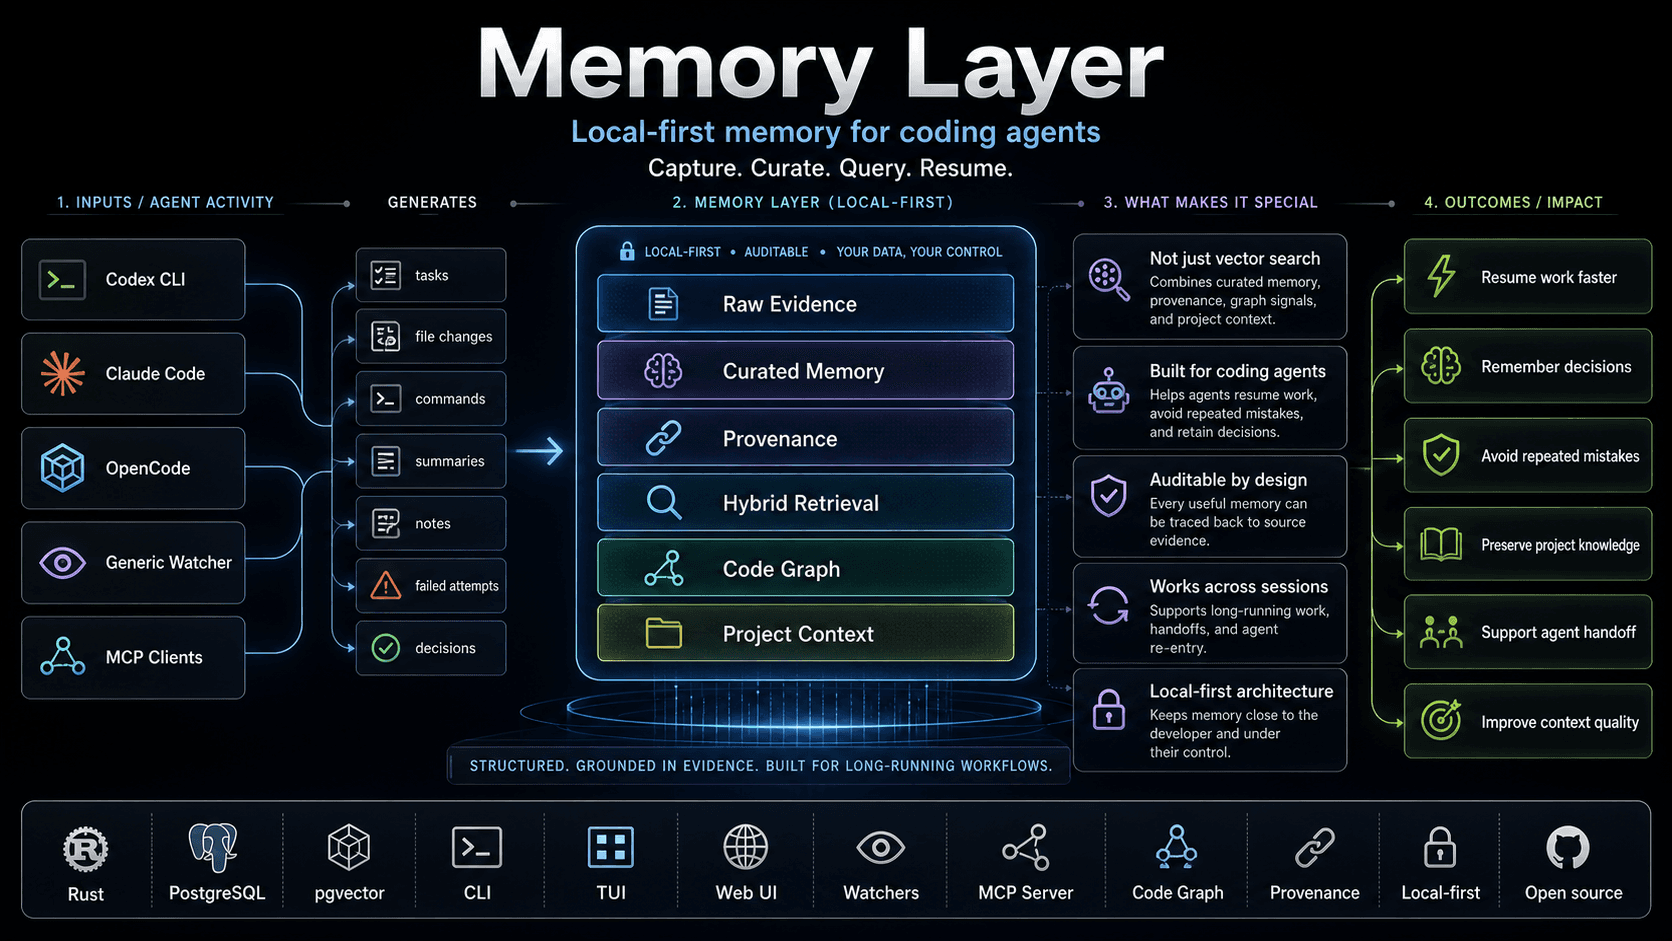
Memory Layer
Memory Layer gives coding agents persistent, project-scoped memory. It captures decisions, context, and rationale from each session, curates them to remove duplicates and noise, and stores the results in a graph and vector database so future sessions can recall what matters and how it connects. It works with Codex, Claude Code, OpenCode and the OpenAI, Voyage and Ollama embedding APIs.
Install Memory Layer, configure storage, and initialise your first project.
Copy a prompt and let your coding agent install and configure everything.
Understand memories, curation, evidence, retrieval, and the code graph.
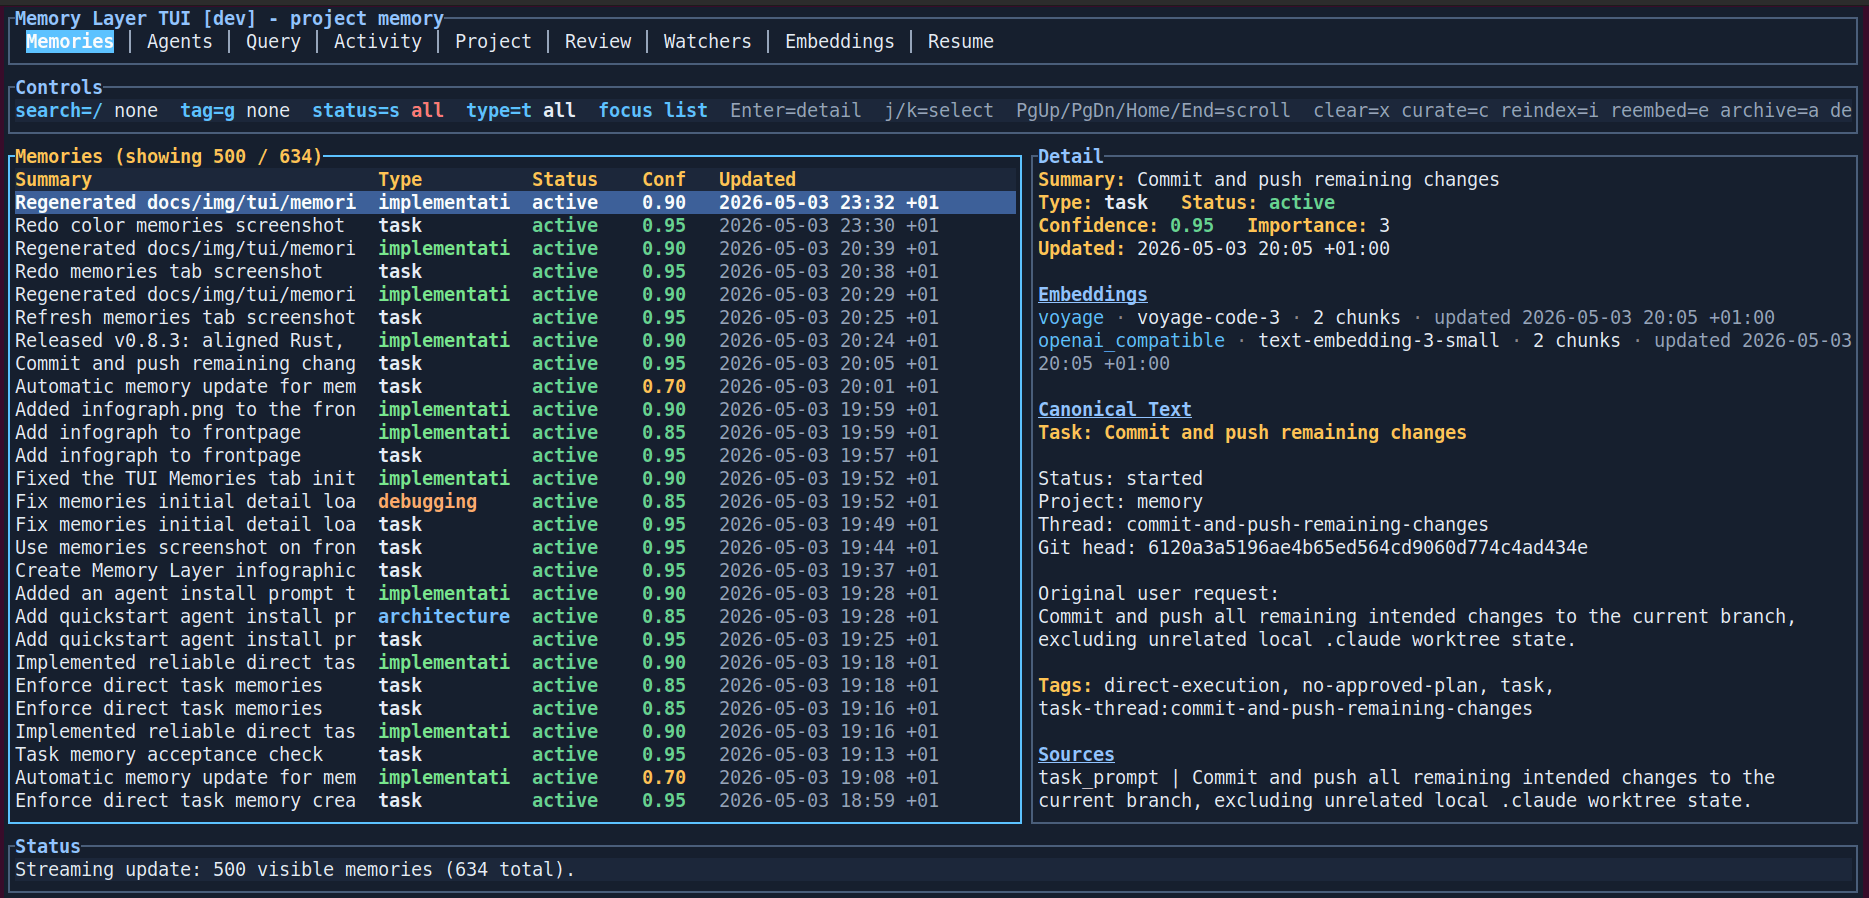
Terminal UI
Browse, search, and inspect every stored memory from the terminal. The TUI shows metadata, confidence scores, embeddings, canonical text, tags, and the original source — so you can see exactly what your agents remember and where it came from and what it relates with.
Browser UI
The service also serves a browser interface for dense inspection of memories, query evidence, activities, watchers, embeddings, errors, and replacement proposals. It uses the same backend APIs as the TUI, so it is useful when you want wider panes, screenshots, or a visual review surface while keeping the service local.
Ask your agent to get you setup
Use the following two prompts to install the Memory Layer application and initialize your repository.
Prompt for installing
Paste this prompt into Claude Code, Codex CLI, or any coding agent to have it install and configure Memory Layer for you.
# Install Memory Layer

You are installing Memory Layer for me. Work in the terminal, explain before using sudo, and stop before destructive changes.

## Goal

Install Memory Layer completely on this machine and configure it for the project I choose.

Repository: https://github.com/3vilM33pl3/memory
GitHub Releases: https://github.com/3vilM33pl3/memory/releases

## Rules

- Detect whether this is Linux/Debian-style or macOS.
- Do not invent secrets.
- PostgreSQL is required. Before running `memory wizard --global`, find an existing database URL or ask me whether to use an existing/hosted PostgreSQL database or create a local one.
- If creating a local PostgreSQL database, create a dedicated database and user named `memory_layer` unless I ask for different names.
- Do not invent the database password; ask me for it or generate one only after confirming that is OK.
- Make sure the PostgreSQL server has pgvector installed and that the target database has `CREATE EXTENSION IF NOT EXISTS vector;` applied.
- Verify PostgreSQL with `psql "$DATABASE_URL" -c "SELECT 1;"` and verify pgvector with `psql "$DATABASE_URL" -c "SELECT extversion FROM pg_extension WHERE extname = 'vector';"` before configuring Memory Layer.
- Ask me for optional LLM or embedding API keys only if I want scan or semantic retrieval.
- Make sure Go is available on PATH so repo-local Memory Layer skills can run.
- Run health checks before saying the install is done.

## Linux / Debian path

1. Download the latest Memory Layer `.deb` from GitHub Releases.
2. Install it with `sudo dpkg -i memory-layer_<version>_amd64.deb`.
3. Prepare PostgreSQL before configuring Memory Layer:
   - If using a hosted/existing database, verify that it accepts connections from this machine and supports pgvector.
   - If creating a local database, install PostgreSQL and the matching pgvector package for the server major version, for example `postgresql-16-pgvector` when the server is PostgreSQL 16.
   - Create or receive a database URL such as `postgres://memory_layer:<password>@127.0.0.1:5432/memory_layer`.
   - Run `psql "$DATABASE_URL" -c "CREATE EXTENSION IF NOT EXISTS vector;"`.
   - Verify with `psql "$DATABASE_URL" -c "SELECT 1;"` and `psql "$DATABASE_URL" -c "SELECT extversion FROM pg_extension WHERE extname = 'vector';"`.
4. Run `memory wizard --global` and configure the verified database URL and optional LLM/embedding settings.
5. Go to my target project directory.
6. Run `memory wizard --dry-run`, then `memory wizard` for repo-local setup.
7. Start the backend with `sudo systemctl enable --now memory-layer.service`.
8. Run `memory doctor`, `memory health`, and then open `memory tui`.

## macOS path

1. Run `brew tap 3vilM33pl3/memory https://github.com/3vilM33pl3/memory`.
2. Run `brew install 3vilM33pl3/memory/memory-layer`.
3. Prepare PostgreSQL before configuring Memory Layer:
   - If using a hosted/existing database, verify that it accepts connections from this machine and supports pgvector.
   - If creating a local database, use Homebrew PostgreSQL and pgvector, then create a dedicated `memory_layer` database and user.
   - Create or receive a database URL such as `postgres://memory_layer:<password>@127.0.0.1:5432/memory_layer`.
   - Run `psql "$DATABASE_URL" -c "CREATE EXTENSION IF NOT EXISTS vector;"`.
   - Verify with `psql "$DATABASE_URL" -c "SELECT 1;"` and `psql "$DATABASE_URL" -c "SELECT extversion FROM pg_extension WHERE extname = 'vector';"`.
4. Run `memory wizard --global` and configure the verified database URL and optional LLM/embedding settings.
5. Go to my target project directory.
6. Run `memory wizard --dry-run`, then `memory wizard` for repo-local setup.
7. Start the backend with `memory service enable`.
8. Run `memory doctor`, `memory health`, and then open `memory tui`.

## Finish

Report what was installed, where the config files are, whether the service is healthy, and what I should run next.
Prompt for initializing your repository
# Initialize Repository For Memory Layer

You are configuring an existing project for Memory Layer. Work in the terminal, explain before changing files, and stop before destructive changes.

## Goal

Create or refresh repo-local Memory Layer configuration so agents can write, query, and curate project memory safely.

## Rules

- Work in the target project directory I give you.
- Do not install the system package; this prompt is only for repo-local Memory Layer setup.
- Do not create or reinitialize git history.
- Do not delete existing `.mem/`, `.agents/`, or Memory Layer config files.
- If `.mem/project.toml`, legacy `.mem/config.toml`, `.agents/memory-layer.toml`, or `.agents/skills/` already exist, inspect them and preserve local customizations.
- Ask me before overwriting files, rotating credentials, importing history, or running a write operation that was not previewed.
- Make sure the shared backend is configured and healthy before saying setup is done.
- Make sure Go is available on `PATH` because repo-local Memory Layer skills use the Go helper.

## Steps

1. Run `memory health` and `memory doctor`.
2. Run `memory wizard --dry-run` in the target project to preview setup.
3. Run `memory wizard` to create or refresh the user-local project config, `.mem/project.toml`, and `.agents/` Memory Layer files.
4. Run `memory doctor` again.
5. If commit history should be available as evidence, run `memory commits sync --project <project-slug> --dry-run`, then run it for real only if the preview looks correct.
6. If an initial scan is wanted, run `memory scan --project <project-slug> --dry-run`, then run it for real only after I approve the preview.
7. Open `memory tui` or report the project slug and next commands.

## Finish

Report which repo-local files were created or preserved, the project slug, backend health, and any follow-up actions.